Portfolio: Snow
Portfolio Piece 1
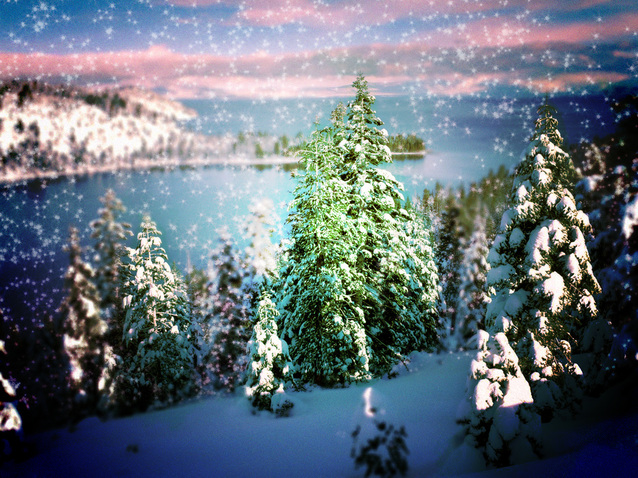
Piece 1 "The Perfect Tree" Directions:
- Find a relatively high resolution picture of a snowy forest scene from Google Images or similar search engines. Download it or save the image and then open it in Photoshop.
- First, you will frame the picture a bit by darkening the bottom corners. To do this, click on the Adjustment Layers button and add a Gradient Fill Adjustment Layer. Set the gradient going from black to transparent. Set the styles as linear, the angle as 90 degrees, the scale as 100%, and check the "Align with Layers box", if the settings are not as described already. Then set the blending mode of the layer to Soft Light. Now the picture should have a brighter center and dark bottom edges. Next, on this Adjustment Layer, add Gradient Overlay Layer Style. Set the Blending mode to Overlay and opacity to 100%. The gradient should transition from white to black. Then, change the style to Radical, the angle to about 120 degrees, and increase the scale as desired. In this piece, I set it at about 125%.
- The next step is to change the coloring of the picture, making it more interesting visually. Add a Curves Adjustment Layer by going to Image at the top menu bar and clicking under Adjustments. At the top of the window that pops up, change the RGB setting to Red. This is an important step. What allowed me to create the effect above was adjusting the curves of the layers under each individual color, as opposed as adjusting all the colors under RGB. Play around a bit with the shape of the curve as you wish. After the Red layer, the picture had a bluish tint. After the Green layer, the trees looked more green. After the Blue layer, the snow was a light blue, the sky was a bit purplish, and the trees were a bright green.
- Next, under the Gradient Fill Layer but above the picture layer, create a new blank layer by clicking in the bottom right corner. Using the color palette, set the background color as a mild pink, at the top of the box and directly in the middle of the white and the strongest pink. The exact color I used was #ff75f0. Click control + backspace to fill the layer with this color. At this point, you will see an entirely pink layer with darkened corners. Then, to make the snowy forest scene visible, set the Blending Mode to Overlay and decrease the opacity to around 30%. The goal is not to make everything look blatantly pink, but to just give a pinkish tint to the snow, sky and clouds. This softens the scene overall, giving it more of a dream like quality. Then, add a Layer Mask by clicking the button in the bottom right corner and set the foreground color to black. Click in the Layer mask, and using a 50% opacity Soft Brush, go over particular trees you want draw attention to. I chose 3 trees, one closest, one in the middle, and one farther away. By doing this, the pinkish glow disappears, and the bright green, set using the Curves Adjustment Layer, is visible instead, highlighting these particular trees. If you make any mistakes and the sky or background around the tree also becomes greenish-blue, use a change the other color on the palette to white, toggle to that, and use a white brush to correct your mistakes.
- Then, select the layer containing the snowy forest scene, and click control + j, to copy the layer. On this copied layer, apply a Lens Blur Filter with the shape of a hexagon and a radius of about 20. Set the other settings as follows: Blade Curvature- 12, Rotation- 31, Brightness-1, Threshold- 124, Noise-3. Change the distribution to Gaussian, and click OK. You should be able to still make out basic shapes and lines, but the details should be blurry. Then, add a Layer mask to this layer, make sure black is set as the background color, and select a soft brush in the Brush tool. Set the opacity of the from 80%-100% as desired (I used 100% to emphasize the clarity and make that object the point of interest). Click on the Layer mask and go over the same trees excluded from the pink glow with the brush. In other words, the bright green trees should also be the trees that aren't blurry. Again, use a white brush to correct mistakes.
- The last step is to add some falling snow to the scene. Add a layer above the Blurred Layer but under the Pink layer. Select a small Star brush (which can double as a snowflake brush), and make white the foreground color. Under Window, click on Brushes (or if it already on your right side bar, click there). Click on Brush Tip Shape and set the spacing to around 70%. Under Shape Dynamics, set the Size Jitter and Angle Jitter around 50%. Under Scattering, set Scatter at 700% and Count at 9. Then, drag the brush all over the image until it is thoroughly covered with snow flakes. Lastly, add a layer mask to this layer. Using a soft black brush, go over the same trees you excluded from pink tint and blur again to direct the attention there, and also go over any snow on the ground. Since once snow hits the ground, one can't see the snowflakes anymore, this last step makes the picture look more realistic.
Portfolio Piece 2
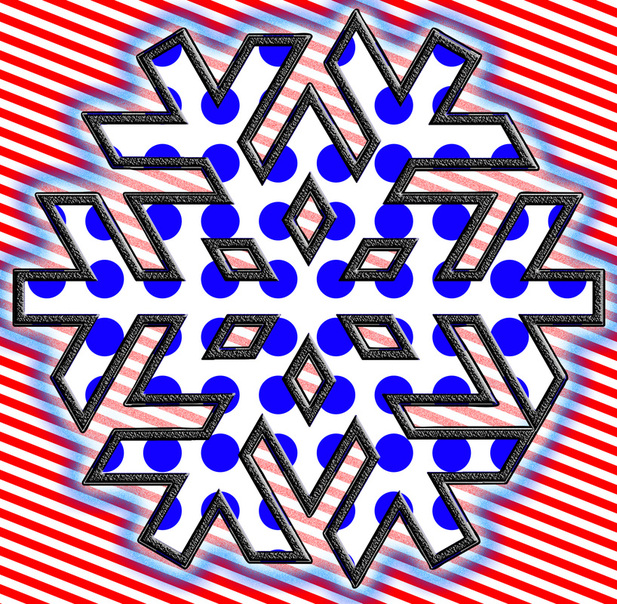
Piece 2 "Lichtenstein Snowflake" Directions:
- Find an very simple picture of the outline of a snowflake. It should just be the shape, defined by a black border, comparable to a snowflake one would find in a children's coloring book. Save the picture, and open it in Photoshop.
- Select the Magic Selection Wand, and click on both the outside and the inside of the snowflake, so that only the black outline of the snowflake is selected. Then, click on the edge of any gaps on the inside of the snowflake. Make sure that in the top left corner, you have the "Add to Selection" button clicked as opposed to the "New Selection" because this is what allows you to click twice. Once you have the black selected, click control +j to get a new layer without the black background. If you have some trouble with this, you can also Select> Color Range>Shadows, or just use the Magic Eraser tool to erase the white sections.
- The next step is to fill the Snowflake in with the blue dots, for a halftone effect. One can try to use the Halftone filter by selecting the shape, filling it with a color in a layer below the outline (control + backspace), and the applying the Halftone Pattern dot filter to that figure. However, the snowflake picture was too large for that and I was unable to get the dots as a large as I wanted them, so instead I used the Circular Marquee Tool. Hide all existing Layers, create a new layer and select the Circular Marquee tool. Select a vibrant, but dark blue as the foreground color. I used #1200ff. Then, make an even circle and fill it in with blue. Make several copies of that layer by clicking control + j and use the Move tool to drag them in straight lines all the way across the document. Use the grid to make sure they are evenly spaced. Then, once you have one full row, Merge Visible to get all of the circles into one layer. Then, several copies of that layer, and use the Move tool to drag them down the page until the entire document, or at least a square the size of the snowflake, is covered in a grid of blue dots. Create a new layer on the bottom and fill it in with white. Then, Merge Visible again so that all the dots with a white background are in one layer. At this point, un-hide your snowflake outline. Click on the snowflake layer. Using the Magic Selection Tool, click on the outer edge of the snowflake outline so that the moving dotted line runs along the outside of the outline and around the edge of the square document. Then, click on the Blue Dot layer (the Selection should remain there) and select the Magic Eraser Tool. Click once on the background of unwanted dots, inside the selection, and they should disappear. Repeat the steps for the inside gaps in the snowflake: select them on the outline layer, then transfer to the dot layer, and eraser them using the Magic Eraser tool. In the end, one should be left with a black outline on the edges of the snowflake, the dot pattern filling the inside, and transparent space outside of the shape.
- Continuing on, we are going to create the red and white, "candy cane" pattern background. Create a new layer and place in on the bottom of all of the visible layers. Fill the space with white (white as the background color, then control + backspace). Then set the foreground color as a bright red. I used #ff0000. Select Filter>Sketch> Halftone Pattern. Select the Pattern Type as Line, the Contrast as 50 (the maximum) and adjust the size to your liking. I also set my size at the Maximum- 12. The reason the size must be so big is because again, the original picture was a high resolution and a large size to begin with. At this point you should have a background of horizontal, crisp red and white lines. Then, making sure you are on the correct red and white lined filter, click control + t to transform. Use the Rotate tool to rotate the pattern until the lines are at about a 45 degree, diagonals slant. Then, enlarge the pattern so that it fits over the entire page again (the corners will not be covered from the rotation). Click the check in the top right corner.
- Lastly, we are going to add our wintry effects by using Layer styles. Click on the snowflake shape layer (black outline) and apply a Bevel and Emboss. Set the settings as so: Style-Inner Bevel, Technique-Smooth, Depth- 1000%, Size- 13px, Soften- 0px, Angle- 30 degrees, Gloss Contour- 2nd row, 5th column (stepped incline), Highlight Mode- Normal with 100% opacity, Shadow Mode- Normal with 100% opacity. Under Bevel and Emboss, set Contour settings as Contour- 1st row, 6th column (wavy uphill slope), Range 50%, and Texture settings as some sort of white rock with small, dark dots, scale 146%, and depth 100%. Then, select the outline of the snowflake right-click and pick Make Work Path. In a new layer, click the Pen tool, right-click, and select Stroke Path>Brush. Make sure the foreground color is black, and the brush is a soft, about 20px size. Finally, on this layer, apply an Outer Glow as follows: Blending Mode- Normal, Opacity- 85%, Noise- 100%, Dark blue to light blue to white Gradient, Technique- Softer, Spread- 2%, Size 128px, Contour- 1st row, 3rd column (deep "u" shape), and Range 50%.
Portfolio Piece 3
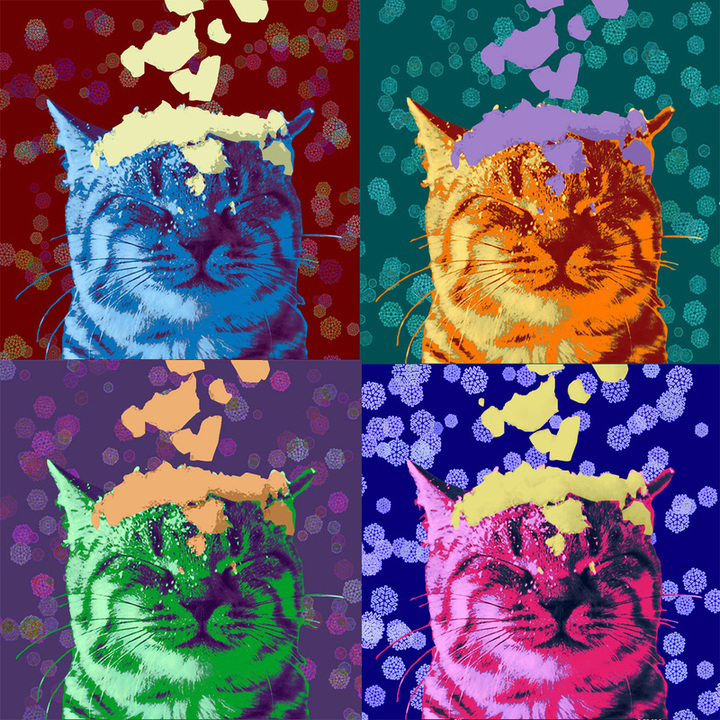
Piece 3 "Andy Warhol Cat with a Head of Snow" Directions:
- First, find a picture you would like to which you would like to apply Andy Warhol effect. I chose a picture of a cat with snow falling on it's head. Open it in Photoshop, and use the Pen tool to put a path around the cat's head, making it a selection, and clicking control + j to cut out it out from the background. I repeated these steps to go around the snow, which I want to separate from the highlights of the fur by making it a different color.
- Then, go to Select>Color Range>Shadows, and after you hit ok and the selection appears, click control + j to put it into it's own layer. Repeat this step for the Midtones and Highlights Color Ranges. Then, click Edit> Fill> Color, and select the color you desire that layer with. Make sure that the Preserve Transparency box is checked, so that only the parts of the cat are filled in, as opposed to the entire layer. When filling in the Shadows and the Highlights, change to opacity from 100% to 50%, so that the shading and the depth perception remains clear in the image. Fill the Midtones in with 100% opacity though, in order to give the picture the vibrant color that is so Andy Warhol-esque. **Side note: you may use the colors I chose or any other color you like. If you do choose your own colors, using a color wheel could be helpful, as colors on opposite sides of the color wheel look good together. I have also found that using the same general color also serves to bring a sense of harmony to a picture containing a lot of diverse and bright colors.**
- Then, select to snow layer, and again fill it with whatever color suits you, but use a 50% opacity so that it retains a snow-like appearance. After you have filled it with color, apply the Cut Out filter (under Artistic). I used the following settings: Number of Levels- 5, Edge Simplicity- 1, Edge Fidelity- 2. Then, apply the Ocean Ripple Filter. I used to following settings: Size- 9 and Magnitude- 9. Both of these filters improve the snow-like appearance, also recovering the 3-dimensional that was lost a bit when we filled the snow in with color.
- The next step is to fill in the background with any color of your choosing by setting your preferred color as the background color and clicking control + backspace. Then, find a cartoon shaped snowflake on the internet. It should be a simple black and white shape outline, such as one you find in a children's coloring book. Save the picture and open it in Photoshop. Surround the shape with the Rectangular Marquee tool, and click Edit>Define Brush Preset to make it a brush. Toggle back to the other document, click on the Brush tool, select your newly made brush and then go over the right side and click on Characters (if it is not in the right-side tool bar, go to View). Under Brush tip shape, set the spacing at 150%. Under Shape Dynamics, set the Size Jitter at 70%, and set the Angle Jitter at 100%. Under Scattering, set the Scatter at 300% and the Count at 1. Under Color Dynamics, set the settings as follow: Foreground/Background Jitter- 100%, Hue Jitter- 41%, and Brightness Jitter-45%. Lastly, for the size, I used a 150x Brush. Set you foreground color to white and set your background color to a light color that will complement the color you have already selected for you background. Apply a couple swipes all over the background. Next, copy the layer by clicking control + j, and apply the Glowing Edges Filter to the upper background layer. Set the Blending Mode as Luminosity, and lower the opacity until you can see some of the original background color shining through. When you are content with the coloring and the background, Merge all the layers associated with the product you have been working on.
- At this point, you should have one colorful layer visible, one layer with the originally colored cat, cut out from the background, and one layer with the cut- out snow. Hide your first colorful layer and repeat the steps above 3 times until you have four differently colored layers. Never merge the originally colored layers in with the others because you will continue to make copies of these that you can use to make the other 3 coloring, When you have four, open a new document that is 12x12 inches, or some other square shaped with an even number of inches. This will make it easier to merge all the documents into a 2x2 grid (the way Andy Warhol arranges his pieces). Use the Move tool to drag the squares from the other document, which should be minimized. Make the square you are trying to drag is visible. Then, use the Transform tool, along with the Grid as a guide, to correctly size and position the pieces. Keep in mind that cropping to make the picture more square could be helpful.
Portfolio Piece 4
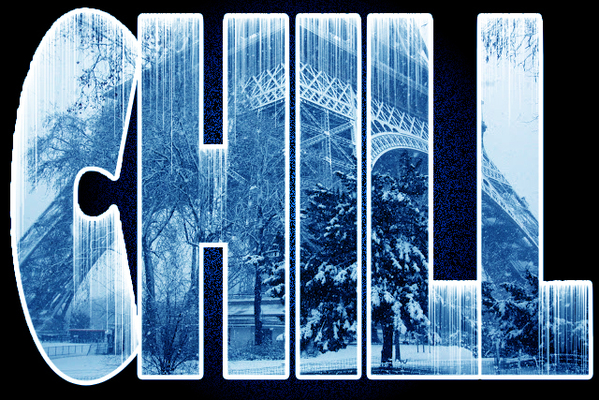
Piece 4 "Chill" Directions:
- The first step is to find an interesting black and white picture of snowy scene on the internet. I used a picture of the Eiffel Tower covered in snow. Save and open the picture in Photoshop.
- Click on the Text tool, and type any word associated with the cold or snow. I used the word "Chill". Make sure to pick a thick font, one in which the letters fill up most of the space of the document. If needed, you could also change the font to bold. Click on Characters in the right side panel or under View, and click on the button called "Set the tracking for selected characters" (AV with horizontal line underneath). Change the number to 55, which puts the letters closer together, which will allow the letters to take up more space with they are made larger. Click control + t to Transform, and make the words as bis as possible, stretching them to fill the entire space.
- The next step is to apply the icicles. Click Edit>Transform>Rotate on 90 degrees CW. Apply the Wind filter (under Stylize). Set the settings as Wind for Method and from Right as Direction, and click Ok. Click control + f two times to apply the same filter two more times. When you are finished, click Edit>Transform>Rotate 90 degrees CCW, to rotate the word back in the correct position. Then, apply a White Stroke to the letters. Set the settings as follows: Size- 5px, Position- Outside, Blending Mode- Normal, Opacity- 100%, Color- White.
- Next, make sure the layer containing your chosen picture (in my case the picture of a snowy Eiffel Tower) is above the Text Layer. Create a new Layer, place on the bottom of all the layers, and fill it in with black. Then, go back to the picture layer, the top layer, and click Layer>Create Clipping Mask. This should cause the picture to be visible in the shape of the letters and the rest of the space should be the black background. Now, since the black and white is a bit of a boring color scheme in this instance, click on on the picture and add a Color Balance Adjustment Layer. I chose a Dark Blue color, since I am using the theme of snow, but you can use any color you choose.
- The last step is format the the background. Click on the Background Layer and apply a Gradient Overlay. Set the Gradient as moving from a dark blue, or whatever color you chose to use in the Color Balance, to black. Try to match the shades of blue (or whatever color) as closely as possible. Then at about two-thirds the length of the gradient, add another black marker, so in totally, the first third of the Gradient should be blue and the latter two-thrids should be black. If in the end, your blue circle is two small, you may come back and adjust this so that the black marker starts at about three-fourths the length of the gradient. Set the rest of the settings as follows: Blend Mode- Dissolve, Opacity- 40%, Style- Radical, Angle- 90-degrees, Scale- 150%.

Portfolio Piece 5
Piece 5 "Snowflake" Directions:
- Find and save a picture of a real or realistic looking snowflake. Open it in Photoshop. Use the Magic Selection tool, making sure the settings in the top left corner are “Add to Selection”, and click all around the snowflake until every part is selected, even small gaps on the inside of the ornate shape. If you are able to select everything without the moving dotted line also surrounding the edge of the document, click control + j. However, when I was clicking around the snowflake, the selection tool made two lines, one around the snowflake and one around the edge. If this occurs, right-click, while still on the selection tool, and pick Layer Via Cut. This should cut and paste all of the background space into a new layer above, leaving just the snowflake in the layer beneath it, the surrounding space being filled by the background color. Next, use the Magic Eraser to click around the snowflake, until only transparent space remains. Delete the layer above, containing the original background.
- Add a layer underneath the one containing the snowflake and fill it with black. Then, select the snowflake layer and click control + i, to invert the image. The snowflake, which was originally a light white and light yellow, is now a dark glowing blue with streaks of black. Set the blending mode of the Layer to Color or Hue. Then, apply a Brightness/Contrast Adjustment Layer. Set the Brightness level at 150 (the maximum) and the Contrast at -50 (the minimum).
- Next, hide all the layers you have and click on the Text tool. Proceed to type up a couple word that describes a snowflake, or associations you make with snow, all in different text layers. I used “Unique”, “One of a Kind”, “Delicate” and “Fleeting”. Then select a different font for each of them that you feel matches the sense of the word. Some of the fonts should be ornate and curvy, while others should be thick and blocky. In other words, have a variety of fonts. Increase the size if needed, and use the Rectangular Marquee tool, and make each of these words into their own brush. Then, hide or delete these layers.
- Add a new layer above the snowflake layer, fill it in with black, and add a Layer Mask. Hold down Alt and click on the Layer mask. This should case the Layer mask to become your screen. Select a black brush, and apply your newly made brushes in an organized manner, with some kind of pattern, until they cover the layer mask. Make sure that the words don’t overlap majorly, so that they words are still somewhat readable.
- Then, select the bottom black layer. Change the brush to one of the star brushes and increase the size to 200x or greater. Then, starting at the top left corner and moving in the direction of the bottom right corner, give the layer a couple swipes, going back and forth in a diagonal line that stretches from the top right corner to the bottom left corner. This reveals the rest of the words. Make it somewhat random and don’t white out the entire layer.
Portfolio Piece 6
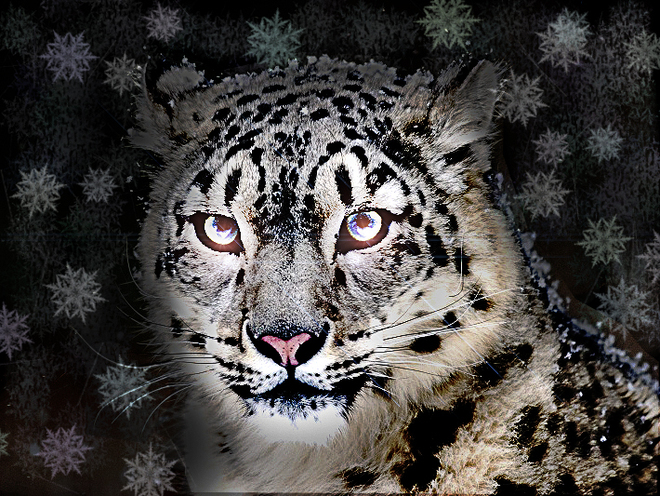
Piece 6 "Snow Leopard" Directions:
- First, choose a picture of a snow animal (or any animal for that matter) from the internet, save it, and open it in Photoshop. Make sure it is a pretty high-resolution picture. I have found the ones on the National Geographic Website are very good.
- The next step is to apply the Dragan Effect to the photo. First, adjust the Levels to 25, 1.00, and 200, respectively. Then apply a Hue and Saturation Adjustment Layer. Leave the Hue at 0, but set the Saturation at -21. Copy this layer by clicking control + j, and apply the High Pass Filter (under Other), and set the number at 3. Then, I used the Dodge and Burn tools to lighten the eyes, and darken spots of the fur that were too bright.
- Then, add a new layer at the very top of all your existing layers, and fill it with black. Set the Blending Mode as Overlay, and lower the opacity to about 40%-50%. Then, add a Layer mask to this layer, and use a black brush to go around the body of the cat. This doesn’t have a noticeable effect now, but it will help in the following steps.
- Next, Click back to the layer with the Snow Leopard. Apply a Lens Flare filter to both eyes. Set the settings as the kind of flare as Movie Prime and the brightness as 58%.
- Next, from the Internet, find a picture of a real or realistic-looking snowflake. Get rid of the background either through the Selection tool or the Magic Eraser tool. Surround it with a Rectangular Marquee and click Edit>Define Brush Preset. Toggle back to your other document and, if not already selected, click on the layer containing the body of the cat. Select your newly made brush, and set your Characteristic (in the right side tool bar or under View) as such: Spacing- 90%, Angle Jitter- 25%, Scattering- 30%, Foreground/ Background Jitter- 50%, Hue- 50%, and Brightness- 50% Set your foreground color as white and your background color as light blue. Apply this brush all around the cat in this layer, trying not to go over the actual snow Leopard. It should be a pretty dense layer of color.
- Then, use the Pen tool to create a Path around the cat, make the selection, and click control+ j to put just the cat in a new layer. Underneath it, make another new layer, fill it with black, and set the Blending mode to Overlay. This helps to dull the background we just created using the Snowflake brush that was almost to colorful and chaotic. On the layer with just the cat and now background, add a couple larger snowflakes, but don’t apply too many. There should be a good amount of space between each. Also, in Characteristics, set the Brightness Jitter to 0%. Lastly, on the Black Layer below this one (the black layer you just created), take the a Soft Eraser tool, lower the Opacity to about 40% and lightly erase some of the black background so that a bit more of the very dense and colorful snow flakes show through.
Portfolio Piece 7
Piece 7 "Frost the Snowman GIF" Directions:
- Open a 12x12inch document in Photoshop, and fill the background layer with blue. In a different layer, use the Rectangular Marquee tool and fill in a white rectangle that goes up about one-third the side of the document by setting white as the background color and clicking control + j. Then, under Filters, click on the Liquify tool to make the white hills. Set the Brush size at about 600 and set the brush pressure at about 75. Then, set your foreground color to a medium shade of gray, and use a soft brush to trace the outline of the hill, defining its shape. Don't worry if it seems to stick out a bit because the next step fades the line a bit and give it a more natural appearance. Apply the Grain Filter (under Texture in the Filter Gallery). The settings are Grain Type-Soft, Intensity- 50px, and Contrast- 100px.
- Add a layer and use the Circular Marquee tool to make the head of the snowman. In a different layer, make a slight larger circle for the middle portion of the snowman, and again, in a new layer, make an even larger circle for the bottom of the snowman. Keep them in separate layers at first so that you can adjust them through the Transformation tool if needed, but once you are content with their appearance, merge them all into one layer and move them to the right side of the document. Next, select the Pen tool. Use the drop points to form a triangle, then right-click, and fill the path with orange to make the nose. Click control+j to copy this layer, and then click Edit>Transform>Flip Horizontal and use the move tool to position the nose on the other side of the head. In other words, you should have one nose facing one way, and the other nose facing the opposite direction. This is going to allow you to make the head move when making the GIF. Next, use the Pen tool again to make the (branch) arms. Make sure that your foreground color is set at dark brown, and you have soft 25px brush selected. Drop three points in an "L" shape, right-click, and stroke the path, using the Brush. Then, use the brush tool to draw an extra cut-off branch end. Then, make a copy of this layer, click Edit>Flip Horizontal, and use the Move tool to place this arm on the other side of the body. When you are content with the placement of the arms, merge them with the layer containing the snowman's body.
- Next, use the pen tool to make Frosty's famous magical hat. Drop the dots to make the shape, right-click, and fill the hat with black. Copy this layer four times by clicking control + j four times. In each of these layers, use the transform tool to put the hat in a different position the journey from ground to Frosty's head. The idea was that a gust of wind blew the hat onto his head, so throughout all of the layers, I rotated the hat in a full circle as well as moving it up towards his head. For the general idea, here are the main positions: 1. On the ground, next to Frosty 2.The bottom of the hat, tilted so it opens to the right, and about half up the bottom circle of Frost's body 3. Still facing to the right, but now tilted upward as opposed to titled more towards the ground, and at the level of the snowman's middle circle. 4. Rotated so that the hat now opens to the left, hovering just above Frosty's head 5. On top of Frosty's head. On the very top layer, apply an Outer Glow. Set the settings as follows: Blending Mode- Lighten, Color- Light Yellow, Technique-Softer, Spread-16%, Size- 250px, Contour- 1st column, 1st row (straight diagonal line). Then in a new layer, use a soft light yellow brush to draw lines that sort of represent "magic" around the hat.
- Continuing on, click the Text tool, and type the word "iFrosty" in Charcoal CY font and black color. Then, use the Transform tool to make it bigger. Use the Move tool (or also the Transform tool) to place the Text box in the lower left corner. Then, go to the Shape tool, click the Custom Shape setting in the top bar, go over to the drop down menu, and select the speech bubble. Create a speech bubble that fills up the space on the left side of the document. Click Flip Horizontal so the triangular shape in at the bottom of the bubble that indicates who is speaking is facing towards Frosty. Then, create another Text box, and in the same color and font, type "HAPPY BIRTHDAY!" in all caps (Frosty's first words in the cartoon).
- The last step before the actual creation of the GIF, is to set up for the effect of falling snow. You will need a layer for every frame, which in the end will be 11. In the first frame, use the star tool, with these Characteristic settings: Spacing- 100%, Size Jitter- about 20%, Scattering-300%, and Count-1, and the Size- about 10px (relatively small). Apply a couple to very top of the first frame. Then, control + j to copy the layer, use the Move tool, to move those flakes down (to show they are falling), and then click on the brush tool again, and apply a couple more swipes to the now empty top space. Repeat this step until you have 11 layers.
- The final step is to make the GIF. Under Window, click Animation. If you don't know, how you control what appears and doesn't appear in the frame is through hiding and unhiding certain layers, which is the reason for the creation of so many layers in the previous steps. First, we are going to set all settings except the falling snow. Also, to create a new frame, you click the button at the bottom of the animation window that looks like a stick note stack with the top sheet folded at the corner. Here is a list of what needs to be visible of each of the frames (also as a rule, unless I mention a change, all previously stated layers should remain visible): 1. Begin with Frosty's body, his right-ward facing nose, the hat on the ground next to him, and the"iFrosty" text 2. All remains the same, except hide the first hat layer and unhide the second hat layer. 3. All remains the same, except now the third hat layer should be the one visible. 4. All remains the same, except the fourth hat layer should be visible 4. All remains the same, except the fifth hat layer should be visible (the last hat layer, the hat should be on Frosty's head). 6. All remains the same, except unhide the yellow "magic" lines. 7. Hide the right-ward facing nose and un-hide the leftward facing nose. Also unhide the yellow "magic" lines. 8. All remains the same, except unhide the speech bubble. Next, use the Tweening tool to add 3 transition layers between the 6th and 7th frame. The last step is to add the falling snow. Simply, go back to the first frame and unhide the first snow layer. For the second frame, unhide the second snow layer and so on. Finally, one has to save GIFs in a certain way. Go to File>Save for Web and Devices, and lower the size to 50%, so it is not too large. In this format, you should be able to post it online.
Portfolio Piece 8
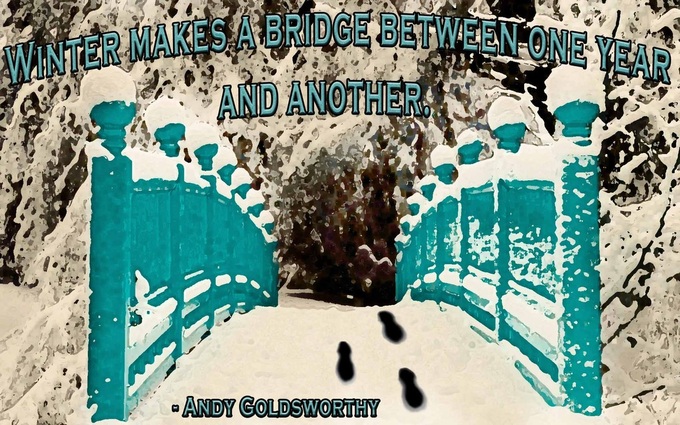
Piece 8 "Snowy Bridge" Directions:
- Find a picture of snowy bridge, save it and open it in Photoshop.
- Apply a Dry Brush Filter with the following Settings: Size- 9, Detail- 4, Texture- 3. Copy the layer, and invert it by clicking control + i. Set the Blending Mode of the inverted layer to Hue or Color.
- The next step is to make the footprints. Download a picture of a cartoon footprint, and open it in photoshop. Add a new layer, and in that layer use the brush tool to go over the shape of the footprint. When you are done, hide the original layer and make this shape into a brush by clicking Edit>Define Brush Preset. Toggle back to the other document and apply this brush 3 times, two in one layer and the middle one in its own layer. Make the middle footstep face the right way by clicking Transform>Flip Horizontally. Click control + t and free transform all of these layers so that they look as if they are in the snow, and as the bridge bends, the footsteps bend.
- Then, copy all of these layers by clicking control + j for all of them. Click Edit>Fill>Black for all of these copied footsteps. Then, use the Transform tool to make these black footsteps smaller. Use the Smudge tools to bring the top of the black footsteps to the edge of the gray to make the footsteps looks more realistic. Then, use the Blur tool to blur the edges of both the gray and the black footsteps. Next, use the burn tool to darken the gray color, making the footsteps look more realistic.
- The next step is to do the text. Use the eyedropper tool to match the color of the bridge as the foreground color. Then, click the text tool, and in one text box type the quote "Winter makes a bridge between one year and another". Then, add a Bevel and Emboss, Stroke, Inner Shadow, and Inner Glow to the text. Set the settings as follows: Bevel and Emboss: Style- Inner Bevel, Technique- Smooth, Depth- 100%, Direction- Up, Size- 5px, Soften-0px, Gloss Controu- Row 1, Column 1, (straight diagonal line); Stroke: Size- 5px, Poistion- Outside, Blend Mode Normal, Opacity- 100%, Color, Black; Inner Shadow: Color- Black, Opacity- 4%, Angle- 95 degrees, Distance- 67px, Choke- 35px, Size- 46px, Countour- row 1, column 1 (straight diagonal line); Inner Glow: Blend Mode- Soft Light, Opacity- 94%, Noise- 100%, Color- White, Technique- Softer, Source- Edge, Choke- 100%, Size- 7px, Contour- row 1 column 1 (straight diagonal line), Range- 42%, Jitter 16%. Then, select the text tool , and add another text box with the words "-Andy Goldsworthy". Copy the other text layer, and use the move tool to move the Layer styles to this new text layer. Then, delete the copied layer. Place the first layer above the bridge and apply an arch shape to it, by clicking on the button to the left of the color selection. Place the second the box, and the bottom of the page to the left of the footsteps.
- Lastly, above all the image layers but under the text layers, add a new layer. Fill it with white and set the Blending Mode to soft white. Add a layer mask and use a soft black brush to go around the bridge in the background, so that bridge is brighter and whiter than the rest of the picture.
Portfolio Piece 9
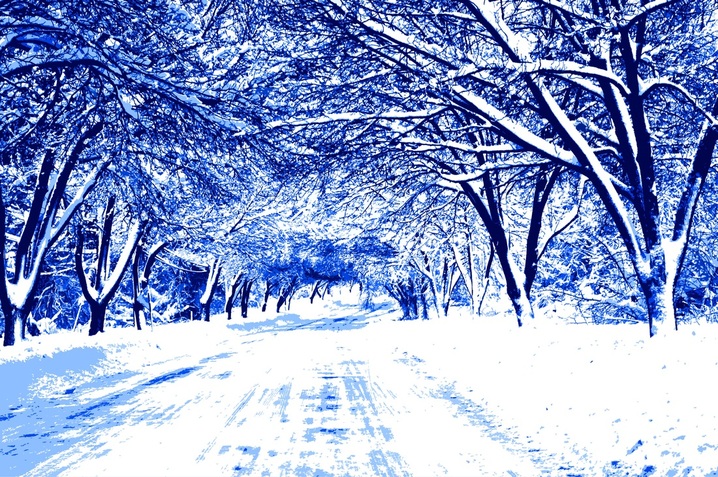
Piece 9 "Snow Street" Directions:
- Find a picture of a snowy street, save it, and open it in Photoshop.
- Click Edit>Adjustments>Posterize. Then, make two copies by clicking control + j. In each of these three layers, click Edit>Adjustments>Threshold. In the bottom layer, move the arrow all the way to the right, in the middle, put the arrow somewhere in the middle, and in the top layer, put the area all the way, or close to all the way, to the left.
- Then in each of these layers, click Select>Color Range>Shadows, and click control + j. Have it so the only the newly created shadow layers are visible, not the layers to which you applied the Thresholds. Then, fill each layer in with a color blue, the lightest at the bottom and the darkest at the top. Here are the exact colors I used: Lowest= #8fc7ff, Middle= #0055e1, and Highest= #001f54.
- On the bottom or lowest layer, apply an Outer Glow, using a light blue similar to the one you used to fill in the shadows of the bottom layer. Set the settings as so: Blending Mode- Screen, Opacity- 75%, Technique- Softer, Spread-1%, Size- 250px, Contour- 1st row, 6th column (wavy uphill slope), Range- 100%. Add a new layer and place it beneath all the others, at the very bottom, and fill it with white by clicking control + backspace. Then, merge all of these layers into one by clicking Layers>Merge Visible.
- Adjust the Levels of this combined layer to 25/1.00/250 (under Image, Adjustments). Then, apply a Hue and Saturation Adjustment Layer according to the following settings: Hue- +5, , Saturation +48, Lightness- 0. Finally, click on the main tree layer and apply the Cut-out Filter (Under Artistic in Filter Gallery). Set the settings as so: Number of Levels- 7, Edge Simplicity- 1, and Edge Fidelity-2.
Portfolio Piece 10
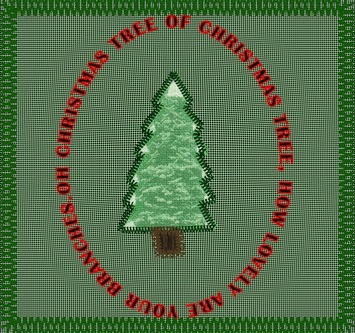
Piece 10 "Stitched Pillow Cover" Directions:
- Find a picture of a snowy Christmas tree, save it and open it in Photoshop. Use the Pen tool to vaguely cut around its shape, make the selection, and click control + j. It doesn't need to be exact, just get rid of the majority of the background. Then, use the Eraser tool to make the sides and event edge, which means you will be erasing some of the ends of the branches. Then, use the Pen tool to draw a path in the stereotypical shape of a cartoon Christmas tree. Apply a Color Balance Adjustment Layer. Set the Settings as so: Cyan/Red- -2, Magenta/Green- +100, Yellow/Blue- + 33, to give the tree a greenish tint.
- Then, add a new layer. In a this new layer, use a Soft white brush with the size of about 39px, to draw snowy tips on the end of the branch points. Change the Blending Mode- to dissolve. Next, select the layer of the tree and apply a Pattern Overlay that gives it the appearance of stitched fabric. Make a copy of this layer, and drag the layer style onto the snow tips layer, and then delete the tree layer that now has now layer style. You made need to lower the opacity of the Layer Style on the snow layer.
- If you have not already, download the stitches brush, which can be found on my Computer Design teacher's page, at this address: http://hisnameisparker.weebly.com/scope-and-sequence.html , under the Stitches section. Click on the Brush selection menu, click on the gear-looking button, and click load brushes. Then, in the Layer window, click on the tab that says "Path" and the Christmas tree shaped path should still be there. Click on it and it should appear. In characteristics, adjust the Spacing so that the brushes are touching each other, and set the foreground color as dark green. Then go the Pen tool, right-click on the path, and Stroke with the brush tool.
- Next, in a new layer, make form the shape of the tree trunk using the Pen tool. You will have to delete the other path first. Right-click, fill the path with dark brown. Then, apply the Fibers Filter. Before you do, make sure the foreground color is set at dark brown and the background color is set at black. Re-click on the path, under the path tabs, if it has disappeared. Make the stitches brush a little smaller and have the foreground color set as dark brown. Then, right-click, Stroke the path with eh brush.
- Next, in an new layer, use the Circular Marquee tool to surround the tree. Right-click, select Make a Work Path. Then, select the text tool, and with it, click on the work path. Begin typing the words to the song "Oh Christmas Tree", and they should appear around the circle. Make the letters black and in Britannica Bold font. Under Character, set the letters as 300% tall, 290% wide, and 73 in the distance apart (button that has VA with horizontal line underneath). Hide all the other layers, click Select>Color Range>Shadows. Right-click, Make Work Path. You may have to delete previous paths before this will work. Make the brush size a bit smaller and set the foreground color as red. Go to Pen tool, and stroke path with brush.
- Lastly, unhide all the layers and use the Rectangular Marquee tool to make a square around the tree and words. Crop the canvas to fit the square. Then, with the Selection tool, right-click, Make Work Path. Make the brush size larger and set the foreground as dark green. Go to the Pen tool, and stroke with the brush. Create a new layer, place it at the bottom and fill it with gray. It will look green from the Color Balance Adjustment above. Then, apply a Pattern overlay to the whole background that looks like stitched cloth. Finally, merge all of the layers and apply the Shpereize Filter to give it image a bit of a 3D pillow shape.
